Get your patient on Imuflex Wb - Sp Blood Bag System With Integral Whole Blood Leukocyte Reduction Filter (Saving Platelets) With Diversion Blood Sampling Arm Anticoagulant Citrate Phosphate Dextrose (Cpd) And Optisol (As-5) Red Cell Preservative For Collection Of 500ml Of Blood - Anticoagulant Citrate Phosphate Dextrose (Cpd) And As-5 Red Cell Preservative (Anticoagulant Citrate Phosphate Dextrose (Cpd) And As-5 Red Cell Preservative)
Imuflex Wb - Sp Blood Bag System With Integral Whole Blood Leukocyte Reduction Filter (Saving Platelets) With Diversion Blood Sampling Arm Anticoagulant Citrate Phosphate Dextrose (Cpd) And Optisol (As-5) Red Cell Preservative For Collection Of 500ml Of Blood - Anticoagulant Citrate Phosphate Dextrose (Cpd) And As-5 Red Cell Preservative prescribing information
INDICATIONS AND USAGE
1.1. Read these instructions carefully before use.
1.2. Rx ONLY.
1.3. Intended for the collection, processing and preservation of Whole Blood and blood components. Not intended for direct intravenous infusion.
1.4. For the collection of 500 mL ±10% Whole Blood.
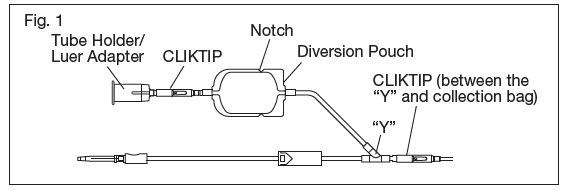
1.5. Integral Diversion Blood Sampling Arm is intended to divert and obtain donor samples for laboratory testing prior to collection of the Whole Blood unit.
1.6. Integral filter unit intended for leukocyte reduction of Whole Blood up to 8 hours after blood collection when Whole Blood is stored at ambient temperature.
1.7. For further processing, use standard component processing techniques.
DOSAGE AND ADMINISTRATION
2.1. To open blister package, peel cover film back 4/5 of its length.
2.2. Prepare the blood bag following your institution's standard operating procedures.
2.2.1. Materials Needed : Evacuated blood collection tubes (glass or plastic)
2.3. Make a loose knot in the donor tubing below the "Y" and CLIKTIP (inline closure device) unless alternate methods are used to seal the tubing at the end of collection.
2.4. Temporarily clamp donor tubing between the phlebotomy needle and the "Y".
2.5. Suspend the collection bag as far as possible below the donor's arm.
2.6. Apply blood pressure cuff or tourniquet to donor's arm. Disinfect site of phlebotomy. If blood pressure cuff is used, inflate to approximately 60 mmHg.
2.7. Remove the needle cover and perform phlebotomy. Remove the temporary clamp on the donor tubing to permit blood flow into the Diversion Blood Sampling Arm pouch.
2.7.1. CAUTION: Do not touch the needle after removing the needle cover.
2.8. Secure the needle safety device in place following the device instructions provided on the reverse side.
2.9. Secure donor tubing to donor's arm.
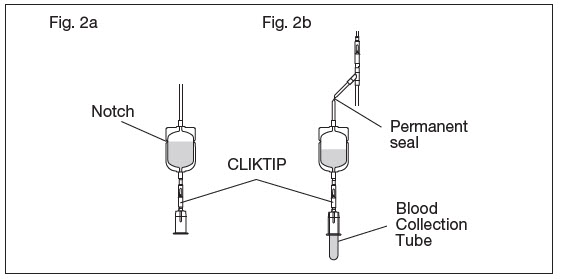
2.10. Position the diversion pouch with the notches up and the Tube Holder/Luer Adapter assembly down. When the level of blood in the pouch is approximately in line with the notches, the diversion pouch is full. (Fig. 2a)
2.10.1. NOTE: The approximate fill volume of the pouch at the notches is 35 mL.
2.11. Permanently seal the tubing between the "Y" and the diversion pouch to maintain a closed system using an aluminum clip or a tube sealer approved for use with tubing connected to a donor (Fig. 2b).
2.11.1. CAUTION: Do not use a dielectric tube sealer to seal the tubing while the needle is connected to the donor's body unless it is approved for such a purpose.
2.12. To initiate blood flow into the collection bag, break the CLIKTIP between the "Y" and the collection bag.
2.13. To avoid clot formation, collect samples as soon as possible from the diversion pouch as follows (Fig. 2b).
2.13.1. CAUTION: Do not collect donor test samples until the tubing between the "Y" and the diversion pouch is permanently sealed.
2.13.2. Break the CLIKTIP in the tubing below the pouch to open the pathway for sampling. (Fig. 2b)
2.13.3. Position the diversion pouch with the notches up and the Tube Holder/Luer Adapter assembly downward. Assure that any air in the pouch is at the top and will not enter the blood collection tubes.
2.13.4. Open the Tube Holder lid and insert blood collection tube firmly into the tube holder; when full, remove sample tube from holder. Repeat to collect additional samples.
2.13.5. NOTE: The pouch may be removed after the donor test samples are collected. A second seal must be made between the diversion pouch and the permanent seal prior to removing the pouch.
2.14. Mix blood with anticoagulant in the collection bag and continue to mix at several intervals during collection and immediately after collection. If using an automated mixer, follow manufacturer's instructions.
2.15. Collect labeled volume of blood 500 mL ±10%.
2.16. When the desired amount of blood has been collected, seal the tubing or tighten the loose knot (white knot) prepared in Step 2.3. Make a second seal between the first seal or knot and the "Y". Various methods may be used to seal tubing.
2.17. Release pressure on the donor's arm and remove the needle into the needle safety device following the device instructions provided on the reverse side. Sever the donor tubing between the two seals previously made below the CLIKTIP and "Y".
2.17.1. CAUTION: Discard the Diversion Blood Sampling Arm and phlebotomy needle/donor tubing according to institutional standard operating procedures.
2.18. Seal and remove donor tubing from collection bag or strip donor tubing as follows:
2.18.1. To obtain a quality control prefiltration sample, strip blood from donor tubing into collection bag, mix well, and allow tubing to refill; repeat once. To prevent the blood from clotting in the tubing, work quickly as possible. Leave an adequate length of tubing containing the well-mixed anticoagulated whole blood attached to the collection bag.
2.18.2. Or, to maximize collection recovery, strip the tubing, mix well and seal tubing close to the collection bag without refilling. To prevent the blood from clotting in the tubing, work quickly as possible. Remove tubing from collection bag.
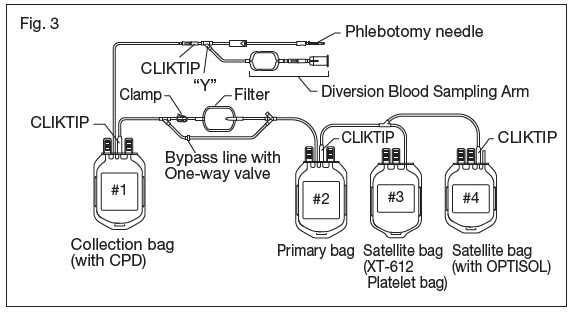
2.19. The blood filtration is executed according to the following operation. (see Fig.3 and Fig.4 )
2.19.1. NOTE: Wait 1 hour after collection before filtering. Filtration can be accomplished when blood is stored at room temperature for up to eight hours after collection.
2.19.2. NOTE: The band guides used to bundle the coiled tubing to prevent entanglement during shipping should be removed prior to filtration (not depicted).
2.20. Mix the unfiltered whole blood unit by inverting the collection bag #1 (pre-filter bag) several times.
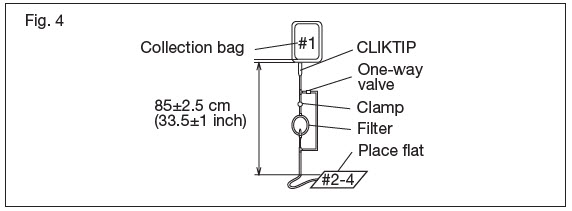
2.21. Hang the collection bag #1, and extend the filtration set to 85 ± 2.5 cm or 33.5 ± 1 inch. Verify that the filter is vertical and ensure all tubing is freely suspended. Position and support bags #2-4 on a flat surface (Fig. 4).
2.21.1. NOTE: This distance is measured from the outlet of the collection bag to the position of the supported bags as indicated in Fig. 4.
2.21.2. NOTE: Verity tubing has been removed from the tube guides and extends freely.
2.22. Break the CLIKTIP at the outlet of the collection bag #1, and start filtration.
2.22.1. CAUTION: Do not squeeze the collection bag during filtration.
2.22.2. CAUTION: Do not squeeze or apply pressure on the filter while it is attached to the bag containing the filtered blood.
2.22.3. CAUTION: If for any reason whole blood passes through the one-way valve, stop filtration immediately and consider the product as non-leukocyte reduced.
2.23. Filtration ends when the collection bag is empty or blood flow has stopped. Close the WHITE clamp above the filter.
2.24. Expel air through the bypass line and back into the empty collection bag #1 by holding the primary bag #2 upright so that the air will be closest to the ports. Gently squeeze the primary bag containing the leukoreduced whole blood until filtered blood reaches the "Y" below the filter. To ensure ease of air removal ensure primary bag #2 is below the filter outlet.
2.25. Open the WHITE clamp.
2.26. Recovery of filtered Whole Blood is complete when the collection bag and the inlet side of the filter have drained or blood flow has stopped. Close the WHITE clamp.
2.27. Seal the tubing as close as possible to the "Y" below the filter and properly dispose of the filter and collection bag #1.
2.28. Strip the post filter tubing into the primary bag #2, mix well, and allow tubing to refill; repeat once. Make an appropriate number of segments of anticoagulated blood for testing by sealing on or near the X marks. Leave segments attached to the filtered whole blood unit.
2.29. The time between Whole Blood collection and component separation may vary depending on both the blood bag system and processing options selected.
2.29.1. NOTE: Platelets should be separated from the Red Blood Cells within 8 hours of blood collection.
2.29.2. NOTE: Fresh Frozen Plasma should be separated from the Red Blood Cells and placed in a freezer at –18ºC or colder within 8 hours of collection.
2.29.3. NOTE: OPTISOL should be added to the Red Blood Cells immediately after removal of the plasma. If plasma is not separated from the Red Blood Cells within 8 hours, OPTISOL may be added within 72 hours of collection if Whole Blood is refrigerated.
2.29.4. NOTE: Other plasma components may be prepared following approved regulations and standards.
2.30. Follow your institution's standard component processing procedures to prepare components.
2.31. Centrifuge filtered whole blood unit to separate red blood cells from platelet rich plasma.
2.32. Break the CLIKTIP of primary bag #2 and transfer leukocytes-reduced platelet rich plasma into XT-612 Platelet bag #3. Clamp the transfer tubing on the Platelet bag.
2.33. Break the CLIKTIP of the OPTISOL bag #4 and drain contents into primary bag #2 containing red blood cells. Seal tubing of primary bag in two places, and cut between seals and separate from Platelet and OPTISOL bags.
2.33.1. NOTE: Empty OPTISOL bag is used for further component preparation.
2.34. Invert the red blood cell – OPTISOL mixture several times to assure the final product is well suspended.
2.35. Store AS-5 Red Blood Cells, Leukocytes Reduced between 1-6°C for up to 42 days.
2.35.1. NOTE: Whole Blood or Red Blood Cells in CPD may be stored for up to 21 days at 1-6°C.
2.36. Store Platelets, Leukocytes Reduced between 20-24°C, maintaining a continuous gentle agitation, for up to 5 days in XT-612 bag.
DOSAGE FORMS AND STRENGTHS
3.1. 70 mL Citrate Phosphate Dextrose (CPD) anticoagulant USP for collection of 500 mL Whole Blood. Each 70 mL contains 1.79 g Dextrose (monohydrate) USP, 1.84 g Sodium Citrate (dihydrate) USP, 209 mg Citric Acid (anhydrous) USP, 156 mg Monobasic Sodium Phosphate (monohydrate) USP.
3.2. 111 mL OPTISOL Red Cell Preservative Solution. Each 111 mL contains 974 mg Sodium Chloride USP, 1.00g Dextrose (monohydrate) USP, 583 mg Mannitol USP, 33.3 mg Adenine USP.
DESCRIPTION / PRODUCT SPECIFICATIONS
11.1. This blood bag system includes a 16 gauge x 1 1/2 inch (1.60 × 38 mm) needle with needle cover and a 500mL (nominal capacity 600mL) collection bag containing 70mL Citrate Phosphate Dextrose (CPD) anticoagulant. The Quadruple blood bag set has one integrally attached empty primary bag, one empty XT-612 5 day Platelet bag, and one satellite bag containing 111 mL OPTISOL Red Cell Preservative Solution.
11.2. Blood bag codes ending in A6 are the collection set with an Integral Diversion Blood Sampling Arm for obtaining donor samples prior to collection of the Whole Blood Unit.
11.3. Blood bag codes ending in A6 also include a DonorCareTM Needle Guard pre-attached to the donor tubing. DonorCare Needle Guard device instructions are provided on the reverse side.
11.4. The blood bag collection set is made of PVC (polyvinyl chloride with DEHP plasticizer).
11.5. The blood bag has no components made of natural rubber latex.
11.6. Tubing internal diameter (ID) nominal 3.0 mm.
11.7. Tubing outer diameter (OD) nominal 4.4 mm.
11.8. Tubing line maximum 16 segments available.
HOW SUPPLIED/STORAGE AND HANDLING
16.1. Single use only.
16.2. Sterile and non-pyrogenic fluid path. Sterilized by steam. Opacity of the blood bag system may be observed. This is due to moisture absorption during the sterilization process. This is normal and does not affect the solution quality or safety. The opacity will diminish gradually.
16.3. A Material Safety Data Sheet (MSDS) is not required for this product.
16.4. Recommended storage conditions: Room Temperature (15-25°C/59-77°F).
16.5. Avoid excessive heat and direct sunlight. Protect from freezing.
16.6. To open blister package, peel cover film back 4/5 of its length.
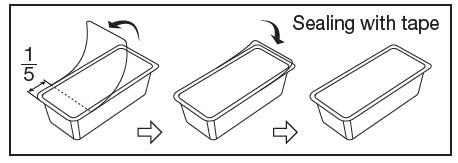
16.7. After opening, the blood bag system may be stored at room temperature for 7 days, or it may be stored for 30 days in the blister package after returning the cover film to the original position and sealing with tape to prevent possible loss of moisture.
16.8. Blood bags in the unopened blister package may be used through the last day of the month and year as indicated on the original manufacturer's packaging.
16.9. The AGELESS packet contained in this package absorbs oxygen and generates heat on removal. Do not open and handle it with care.
16.10. Dispose of the AGELESS packet with the blister tray.
16.11. Do not dispose the AGELESS packet with wastes containing volatile or flammable materials.
16.12. For the Quadruple blood bag set, Code BB • LGQ506A6 is supplied 15/case.